Converting an ASP.net App to a Guest Container Service in Azure Service Fabric
24 Feb 2017
Reading time ~10 minutes
Part 2 - Converting an ASP.net App to a Guest Container Service in Azure Service Fabric
In this example we will be taking our Monte Carlo Simulator Application from Part 1 and converting it into a MicroService in Azure Service Fabric. Service Fabric currently supports deployment of Docker containers on Linux and Windows Server containers on Windows Server 2016. Support for Hyper-V containers will be added in a future release. In the Service Fabric application model, a container represents an application host in which multiple service replicas are placed. In this scenario we will be using Guest Containers. Guest containers: Are existing applications you can deploy in a container. Examples include Node.js, JavaScript, or any code (executables).
Service Fabric enables you to build and manage scalable and reliable applications composed of microservices that run at very high density on a shared pool of machines, which is referred to as a cluster. It provides a runtime to build distributed, scalable, stateless and stateful microservices. It also provides comprehensive application management capabilities to provision, deploy, monitor, upgrade/patch, and delete deployed applications.

Prerequisites
- Windows 10
With the Windows 10 anniversay edition you may need to turn off Secure Boot in the BIOS of your machine in order for the SF cluster to run locally
- Visual Studio 2015 with Update 2 or Later
- Service Fabric Runtime & SDK
- Windows Powershell
- Visual Studio Team Services Account
- Microsoft Azure Subscription
- Docker for windows
Convert to Docker Image
Publish Profiles
In this section we’ll be wrapping our pushing our application into a ASP Docker Image.
We’ll begin by opening up the original Monolith application in Part 1. Open the 1-Original-Monolith.sln file in Visual Studio.
Once the solution is open, Build the projects inside the IDE.
Next right click the MonteMonolith project and select Publish.

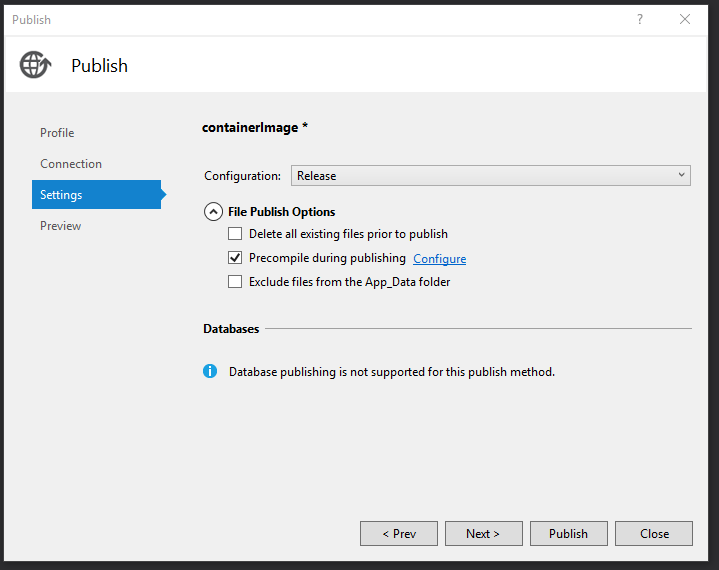
Inside the Publish Profile window select the Custom option. This will alow us to publish artifacts to a directory for our Docker Container to reference.
Enter an arbitrary profile name, in this example we simply called it Containerimage.
In the next window for Connection, Select File System as the Publish Method.
In the Target location, Create a new folder called ‘PublishOutput’ and use this as the target for your web application artifacts. Your target location should look similar to the following:
*\1-Original-Monolith\MonteMonolith\PublishOutput
Open the File Publish Options section of the Settings tab. Select Precompile during publishing. This optimization means that you’ll be compiling views in the Docker container, you are copying the precompiled views.

Select Next and Click Publish in that window.
This packages and compresses your application dlls, and environmet parameters to a directory.
1>------ Build started: Project: MonteMonolith.Framework, Configuration: Release Any CPU ------
1>  MonteMonolith.Framework -> C:\Users\naros\Documents\GitHub\MicroservicesMonolith\1-Original-Monolith\MonteMonolith.Framework\bin\Release\MonteMonolith.Framework.dll
2>------ Build started: Project: MonteMonolith, Configuration: Release Any CPU ------
2>  MonteMonolith -> C:\Users\naros\Documents\GitHub\MicroservicesMonolith\1-Original-Monolith\MonteMonolith\bin\MonteMonolith.dll
3>------ Publish started: Project: MonteMonolith, Configuration: Release Any CPU ------
3>Connecting to C:\Users\naros\Documents\GitHub\montemonolith\1-Original-Monolith\MonteMonolith\Bin...
3>Transformed Web.config using C:\Users\naros\Documents\GitHub\MicroservicesMonolith\1-Original-Monolith\MonteMonolith\Web.Release.config into obj\Release\TransformWebConfig\transformed\Web.config.
3>Copying all files to temporary location below for package/publish:
3>obj\Release\Package\PackageTmp.
3>Publishing folder /...
3>Publishing folder Areas...
3>Publishing folder Areas/HelpPage...
3>Publishing folder Areas/HelpPage/Views...
3>Publishing folder Areas/HelpPage/Views/Help...
3>Publishing folder Areas/HelpPage/Views/Help/DisplayTemplates...
3>Publishing folder Areas/HelpPage/Views/Shared...
3>Publishing folder bin...
3>Publishing folder bin/roslyn...
3>Publishing folder Content...
3>Publishing folder fonts...
3>Publishing folder Scripts...
3>Publishing folder Service References...
3>Publishing folder Service References/Application Insights...
3>Publishing folder Views...
3>Publishing folder Views/Analysis...
3>Publishing folder Views/Home...
3>Publishing folder Views/Shared...
3>Web App was published successfully file:///C:/Users/naros/Documents/GitHub/montemonolith/1-Original-Monolith/MonteMonolith/Bin
3>
========== Build: 2 succeeded, 0 failed, 0 up-to-date, 0 skipped ==========
========== Publish: 1 succeeded, 0 failed, 0 skipped ==========
Docker Containers
Now that we have our publish profile, we will create a docker image from the app parameters.
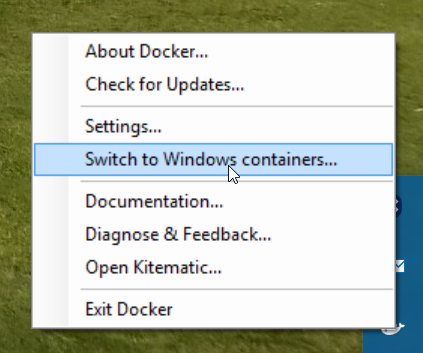
After installing and starting Docker, right-click on the tray icon and select Switch to Windows containers. This is required to run Docker images based on Windows. This command takes a few seconds to execute:

Return back to explorer.
Define your Docker image in a Dockerfile. The Dockerfile contains instructions for the base image, additional components, the app you want to run, and other configuration images. The Dockerfile is the input to the docker build command, which creates the image.
You will build an image based on the microsft/aspnet image located on Docker Hub. The base image, microsoft/aspnet, is a Windows Server image. In contains Windows Server Core, IIS and ASP.NET 4.6.2. When you run this image in your container, it will automatically start IIS and installed websites.
Open Visual Studio Code or a text editor.
Copy the following DockerFile and save and name your file as DockerFile.
# The `FROM` instruction specifies the base image. You are
# extending the `microsoft/aspnet` image.

FROM microsoft/aspnet

# Next, this Dockerfile creates a directory for your application
RUN mkdir C:\monteDocker

# configure the new site in IIS.
RUN powershell -NoProfile -Command \
    Import-module IISAdministration; \
    New-IISSite -Name "ASPNET" -PhysicalPath C:\monteDocker -BindingInformation "*:8000:"

# This instruction tells the container to listen on port 8000.
EXPOSE 8000

# The final instruction copies the site you published earlier into the container.
ADD . /monteDocker
Save the Dockerfile inside your Publish Output directory.
Run the Docker build command to create the image that runs your ASP.NET app. To do this, open a PowerShell window in the directory of your project and type the following command in the solution directory:
docker build -t montedocker .
Here is what your output should look like:
Step 1/5 : FROM microsoft/aspnet
 ---> e761eca2f8df
Step 2/5 : RUN mkdir C:\monteDocker
 ---> Using cache
 ---> 5399a1cabd29
Step 3/5 : RUN powershell -NoProfile -Command     Import-module IISAdministration;     New-IISSite -Name "ASPNET" -Physi
calPath C:\monteDocker -BindingInformation "*:8000:"
 ---> Using cache
 ---> cca8bedb7b6d
Step 4/5 : EXPOSE 8000
 ---> Using cache
 ---> 76a8c917354b
Step 5/5 : ADD . /monteDocker
 ---> 19b7c64ce388
Removing intermediate container 5f12c940e17b
Successfully built 19b7c64ce388
Once that command completes, you can run the docker images command to see information on the new image.
Start a container by executing the following docker run command.
docker run -d --name aspmontedocker montedocker
We now have a working Docker image with our ASP.NET application deployed inside the container.
Publish to Docker Hub
Now that we have our image, we want to deploy our image to a container registy for our Azure Service Fabric Cluster to pull the image and deploy it into the runtime. You have the choice of using Docker Hub as a Docker container Registry, Azure Container Registry or a local Docker Registry for Service fabric to pull your image. (We use Docker Hub in this example)
Sign up for Docker Hub.
Be sure you create a namespace for your Docker images
First, login to your docker account using the docker login command.
docker login

Login with your Docker ID to push and pull images from Docker Hub. If you don't have a Docker ID, head over to https://hub.docker.com to create one.

Username: user
Password: Password

Login Succeeded
Once logged in, the container image can be pushed to Docker Hub. To do so, use the docker push command. Replace ‘user’ with your Docker ID.
docker push <user>/montedocker
The container image can now be downloaded from Docker Hub onto any Windows container host using docker pull
Deploy Service Fabric to Azure
Now that we have our Container image in our Docker Hub Repo, we will now deploy a Service Fabric cluster for us to later deploy a container as a Guest Executable.
At the time of this write-up, Windows 10 image VMs or local machines are unable to support Guest Containers in the Service Fabric Runtime.
Navigate to this directory *\2-Monolith-Docker-ASF\MonteMicroservice
We have created an Azure Resource Manager Template for you to deploy and create a Service Fabric Cluster that is compatible with Containers. Here are some things to note:
- We have selected a specific VM Image for the Cluster to run that allows you to enable containerization. This is our VMImage Sku added in the parameters.json file - “2016-Datacenter-with-Containers”
- The cluster also configures a specific Network Interface setting that allows the cluster to communicate across nodes with containers. This is added in the template.json - “NicPrefixOverride”: “10.0.0”
- We are deploying an Unsecure Cluster for simplicity. For a Secure Cluster that uses Certificates follow this tutorial. For more examples of Secure Clusters review this document.
Inside the directory open the parameters.json folder.
Switch out the following two parameters with values of your choosing
 "adminUserName": {
            "value": "nmrose"
        },
 "adminPassword": {
            "value": "azureIsAw3s0me!"
Open a PowerShell window from the directory.
Sign in to your Azure account:
Login-AzureRmAccount
Select your Subscription.
Get-AzureRmSubscription
Set-AzureRmContext -SubscriptionId <guid>
Create a new Resource Group to Deploy your cluster components to.
New-AzureRmResourceGroup -Name ExampleGroup -Location "West US"
Now Deploy your resoucre template to the Resource Group you just created.
New-AzureRmResourceGroupDeployment -ResourceGroupName "ExampleGroup" -TemplateFile .\template.json -TemplateParameterFile .\parameters.json
This may take about 5 - 10 minutes to deploy all the resources. Once Deployed you can see that the deployment provisioned 5 VMs in a Virtual Machine Scale Set, Storage Accounts, a Load Balancer, a public IP address and a Cluster Manager.
Deploy Guest Container Staeless Service to Azure Service Fabric
Now that we havve our cluster deployed and our docker image ready in Docker Hub, we can now deploy our application to the cluster.
Open Visual Studio 2015
Select File –> New –> Project
Select the Service Fabric Application template under the Cloud tab and name your application.
Select the Guest Container Template and enter your image name based on your docker hub image. For our example the namespace was
Note - Guest Container Services only run on Windows Server 2016. If you are running this on a local machine with Windows 10. you must use the Azure cluster we deployed to debug.
Inside the Application Manifest we set our endpoint.
<ServiceManifestImport>
    <ServiceManifestRef ServiceManifestName="Guest1Pkg" ServiceManifestVersion="1.0.0" />
    <ConfigOverrides />
    <EnvironmentOverrides CodePackageRef="Code">

      <!-- <EnvironmentVariable Name="Guest1Pkg" Value="Container.Application/Guest1pkg"/> -->

      <EnvironmentVariable Name="HttpGatewayPort" Value="8000"/>

      <EnvironmentVariable Name="IsContainer" Value="true"/>

    </EnvironmentOverrides>
   <Policies>

      <ContainerHostPolicies CodePackageRef="Code">

        <PortBinding ContainerPort="8000" EndpointRef="MonteDockerEndpoint"/>

      </ContainerHostPolicies>

    </Policies>

  </ServiceManifestImport>
And Inside the Service Manifest we will expose port 8000 for our ASP.NET application to communicate on.
   <EnvironmentVariables>
  <!--    <EnvironmentVariable Name="VariableName" Value="VariableValue"/> -->
      <EnvironmentVariable Name="HttpGatewayPort" Value=""/>
      <EnvironmentVariable Name="IsContainer" Value=""/>
    </EnvironmentVariables>

  </CodePackage>

  <!-- Config package is the contents of the Config directoy under PackageRoot that contains an
       independently-updateable and versioned set of custom configuration settings for your service. -->
  <ConfigPackage Name="Config" Version="1.0.0" />

  <Resources>
    <Endpoints>
      <!-- This endpoint is used by the communication listener to obtain the port on which to
           listen. Please note that if your service is partitioned, this port is shared with
           replicas of different partitions that are placed in your code. -->
      <Endpoint Name="MonteDockerEndpoint" Protocol="http" Port="8000"  UriScheme = "http"  Type="Input" />
    </Endpoints>
Refer to our MonteService.sln for support included in this folder.
Now we can publish the Application to our Azure Cluster.
Right click the Project in Solution Explorer and Select Publish.

Select Cloud.xml as your publish file.
Sign into your Azure Account and select the Service Fabric Cluster we deployed in an earlier step.
Once Deployed Navigate to the Azure Portal and then to your Service Fabric Cluster.
We now need to create a load balancing rule that exposes port 8000 publically.
Select your resource group from the Service Fabric Cluster Overview.
Select the Load Balncer from the resource list
In the configurations list for the Load Balancer, Select Load Balancing Rules and then Select Add+
Name your Load Balancing Rule, Choose the Protocol and specify the port. Click Save at the top when finished.
Navigate back to your Service Fabric Cluster in the Portal and Open the Service Fabric Explorer. You can also enter the URL for it. Our Service Fabric Explorer URL for the cluster is: http://montecluster.westus.cloudapp.azure.com:19080/Explorer
Here you will see the health of our application and the status of our nodes.
If we navigate to port 8000 now we should hit our Home Page to the ASP.NET application.
Finally if we test our API, we will get a JSON response.